Tuesday, February 28, 2012

BLACK?! Really?

Our front door was painted black.  On the inside and outside.  I really don't know why, except for some reason the sink base in the kitchen is also painted black.

This is the sink base, we couldn't fathom why this was painted black (like it needed to be any darker in that room with all the darker wood):


And here's the offending door (I realized AFTER I painted it I had only the immediate "before" photo of it, with the painters tape and all):


My apologies for the paint can and step stool in the pic.  The white "tape" on the door isn't actual adhesive residue.  I have NO idea what WAS taped there in that haphazard manner, but it's actually where the tape peeled off the black paint.  That fun piece of furniture to the right is a treadle base from an old sewing machine.  The machine is long gone, but the drawers are awful handy!

I used a painting technique that I've used before for some book shelves we use in our booth at an antique mall.  It's pretty easy and has a neat effect.  It uses whatever paint type you have handy-we had some "vintage green" around from a previous project so I didn't get a chance to use our milkpaint yet (I use milk paint for some crafts however, it's AWESOME). 

I didn't photograph a step by step, but you really don't need one.

Step 1) If you have raw (unfinished) wood, paint it with a solid base of your choice, preferably a dark color (in this case the door was already black).

Step 2) Tape off anything you don't want painted (such as the knob, lock and windows on my door).  Blue painters tape works best, but you could probably use masking tape.  Lay paper on the floor or work surface.

Step 3) Make sure your paint is stirred well. 

Step 4) Brush on the paint nearly dry.  This is the hardest part if you are used to painting-you just dab the very end of the brush into the paint.  The point isn't to fully cover the project, it's to let the base show though in streaks.  It's best to paint all in the same direction so your streaks aren't all catywhompus.  If you end up wiht a bit too much paint, clean off the brush and dry brush the area to remove a bit.

That's it!  Here's the finished product:


We do have a sweeper on the bottom and it stands out a lot more with the door painted.  I'm not sure what I'm going to do with that yet.  We're also going to need to introduce more green tones into the dining room and kitchen to tye it together, but it's SO much better than black.  I've been considering painting the sink base the same color, and also putting up some beadboard in the diningroom (wall to the right) and repainting in there.  Time will tell, but I'm happy to get rid of the black hole in my doorway for now!

Monday, February 27, 2012

Cleaning the stove, Part I

So, the Bengal doesn't look all that bad in the listing photos, but when we got there, we could see it could use a good cleaning.  I did some research on cleaning an older stove, and some looking into natural cleaners and came up with a vinegar water cleaner.  I mixed it about 75% vinegar and 25% water because the grease was really cooked on and thick.  I also mixed a 25% baking soda 75% water mix to neuralize the vinegar after cleaning. 

Here are some photos, BEFORE:


And AFTER:


It took about 4 hours and I'm not done yet!  I forgot to take a photo of the black cover that the burner grates sit on, but that was about 2 of the 4 hours worth of work.  I used a straight edge blade to scrape off layer after layer of scum and grease, and followed it with a Brillo pad.  I still have to finish that also.

What I did:

I mixed my vinegar solution and wiped it on with a soft cloth.  It broke up the grease almost instantly.  I then wiped where ever I had cleaned with the vinegar with a soft towel soaked in the baking soda solution.  Finally, I wiped everything down with a damp cloth with just plain water, and dried with a clean soft towel.  I am by no means an expert, but I wanted to use the baking soda water to neutralize the acid in the vinegar since I've heard vinegar can stain and I know that my stove's finish isn't in perfect shape as it is!

Stay tuned, I still have more cleaning to do on the outside, AND inside the oven and broiler too!  We still have to tear out the kitchen floor to do some repairs and find two replacement burner grates so the stove is not yet hooked up.  I am also still looking into converting it into propane.

Tuesday, February 21, 2012

Kitchen dilemma

Now that the great stove search is finally over (the great stove CLEANING, however, has only just begun), I am in search of the ultimate functional kitchen eye candy.  I wanted to wait just in case I happened to find a stove that wasn't white, so it would match.  But now, it's time...as soon as I decide on a color.  It's time to get me a Kitchenaid mixer!  Well, maybe not RIGHT now, but once I decide on a color, I can start bargin hunting my new mixer.  While I really would LOVE the look of a 3c or 4c in green, I wanted to find a newer one because we have our own t-shirt making business and I figured we could create a new line of decals for them.  The older ones are drool worthy, but since they are different in dimentions and style, I need a new (er) one for a template.

My dilemma is this: it seems no one around here carries them in the colors, just white, and I can't decide on which color I want.  I don't mind white, but as you can see from previous posts of my kitchen, it's rather monochromatic (if natural wood can be considered as such).  I want some COLOR!  I know I want either Apple Green or Pistachio.  It's just really hard to decide without seeing them.  I *think* Pistachio is "the" color, but I don't want it to be too washed out.  We have a great vintage Hamilton Beach milkshake maker that I'd like to match to, at least somewhat.

So that's my new kitchen dilemma, now that the stove has been found.  After that, it will be the fridge.  That will be quite a trip as well, I'm sure.  I'm leaning towards whatever one we find with the amazingly cool lazy susan style shelves (how on earth did that not catch on?!), but I've seen some nice ones without that option too.  And of course, we've got size restrictions, although since the refrigerators of that era were smaller than those of today, it should be as much of an issue as when I was stove hunting (if size didn't matter, I'd be looking for a Kelvinator Food-A-Rama, the first side by side).

Saturday, February 18, 2012

A new wood stove photo

I just thought I should post an updated photo of my beloved Lopi.  It's been doing a great job keeping the Cottage warm this winter, and now that we've been here a bit I've added more "stuff" around it.  Mr Eclectic Cottage bought me an antique coal hod to use as an ash bucket.  We've added a great green jug with led lights on the wood box along with other things.  This was my "test run" photo session for this year's Christmas card, which is why there's an abundance of Christmas items:

A new stove!

As I had mentioned before, the kitchen range that came with the Cottage is in poor shape.  The burners function well, but the oven...well...it's scary.  So I undertook an extensive search for a replacement.  I started off looking at new stoves, but decided circuit boards belong in my computer, not my kitchen!  I've been wanting a vintage 50's era stove for many years. 

Originally I wanted an antique wood style stove, but figured insurance companies might not really prefer that (they did make ones with gas burners and a gas oven, as well as a "wood side" so we wouldn't have to over heat the house to cook in the summer).

So, I checked out all the great O'Keefe and Merritt stoves, the Wedgewoods, the Tappans.  I decided I really liked the mint green Chambers, and thought the griddle and Thermowell were pretty cool too. 

I found a 1951 Tappan Deluxe Doughboy with the great chrome oven and light up burner rings.  I was excited.  It even had the chrome crisper trays!  Then we remeasured the area we were going to remodel a bit to fit it, and found here was NO way it would fit :(

Then the stars aligned.  An unusual stove showed up on a nearby Craigslist.  A 30" 1950's stove!!  Anyone that has searched for vintage stoves knows it's rare to find a 30" stove that's from that era.  Typically they are 36"-40" or the smaller "apartment" stoves (21").  But, just listed only 2 hours away (one way) was an honest to goodness 30" stove!!  It's a farely rare maker too.  You'll find O'Keefe and Merritts, even Western Hollys and Magic Chefs, but search for a Floyd Wells Bengal, and there aren't many hits.  I have yet to locate another 30" gas Bengal in all my web searches (if you know of one, I'd love to hear about it).  All I've found are the larger wood/coal and gas combo stoves.

It doesn't have any of the typical bells and whistles of the era.  No bbq side, no thermowell or griddle.  There isn't even an oven light.  Just a cute little white and chrome stove.  Has a great cover for the burners though.  It's PERFECT!

Here it is (these are the listing photos, we haven't installed it yet):


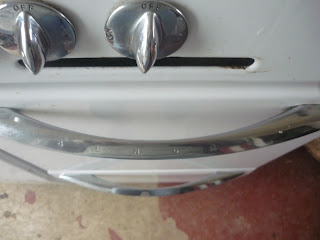
Those two chrome "trim" pieces below the knobs are crumb trays, they pull right out for easy cleaning.


And the data plate:


It appears to be style AA-1.0.

We've got some work to do before we take out the old 30" Hotpoint and swap in this sweet little vintag beauty.  Two of the burner grates are cracked, so they will need to be fixed.  It needs a good, through cleaning.  All four of the burner knobs are cracked, so we'll need to replace or repair them (I prefer repair).  The biggest issue is it has been running on natural gas and we only have propane.  I've struck out with a local company to have it converted, but might have found a valve that can be switched from NG to LG with no orifice changes.  I'll be looking into that. 

In the mean time, we've still got the good ole Lopi to cook in and the Hotpoint has working burners.  I am not in a huge hurry to rush into converting it to propane, I'm just happy to finally have it!

This is a photo from when we bought the Cottage.  Look to the left, you can see the burners from the Hotpoint.  This is where the Bengal will be going:


And a more recent pic, excuse the dishes and mess, I was making chocolate chip oatmeal cookies (in the toaster oven):


A few more pics: