We decided to hand plane the adhesive off. The steamer didn't really touch it, although it did work well to remove the patches of linoleum that didn't want to come up.
Here are some in progress photos
With some boiled linseed oil applied
Wednesday, October 24, 2012
Monday, October 15, 2012
Remember this floor?
This is the old barn floors we originally bought for the bedroom, finding a new home in the hall after a run or two though the planer. Still needs a BLO/Turp mix applied...and to be finished of course! We put down a layer of tar paper, then sleepers, then the floor.
We did a little test on the kitchen floor to try to remove the old adhesive from the floor using mineral spirits.
Before
After
Needs some more work. We are going to try a steamer next. Mineral spirits are stinky and it's not all that warm out to have everything opened up.
We did a little test on the kitchen floor to try to remove the old adhesive from the floor using mineral spirits.
Before
After
Needs some more work. We are going to try a steamer next. Mineral spirits are stinky and it's not all that warm out to have everything opened up.
Monday, October 1, 2012
Bedroom and hall
A sneak peek at the closets we're building:
2x3 frame construction, 2 1/4" x 3/4" trim, 2" x 3/4" slats as shelving and bead board in the sides.
This is a closeup of one of the shutters we're going to use as doors. I wish we had both sides of the hardware. We're going to need make a slat as one is missing on a shutter. I'll scrape and repaint them because we don't really want paint flakes all over the clothes.
These are some pages from the book we want to use as wallpaper in the hall
Starting to wonder if we should just use the reclaimed barn wood instead of trying to make the bricks work in the kitchen so we can use THAT floor in the hall.
Remember the reclaimed wood? This is it, painted. Thinking it might look good painted, with bead board partly up the walls and wall papered above with the book pages.
Just because...we've always wondered about this trim work. WHY??
2x3 frame construction, 2 1/4" x 3/4" trim, 2" x 3/4" slats as shelving and bead board in the sides.
This is a closeup of one of the shutters we're going to use as doors. I wish we had both sides of the hardware. We're going to need make a slat as one is missing on a shutter. I'll scrape and repaint them because we don't really want paint flakes all over the clothes.
These are some pages from the book we want to use as wallpaper in the hall
Starting to wonder if we should just use the reclaimed barn wood instead of trying to make the bricks work in the kitchen so we can use THAT floor in the hall.
Remember the reclaimed wood? This is it, painted. Thinking it might look good painted, with bead board partly up the walls and wall papered above with the book pages.
This could be a neat ceiling fixture...
Side note...this was in the wall in the bathroom. Good thing we killed the power to it. And yes, there were no wire nuts on it when we found it.
Tuesday, September 25, 2012
Why stop with the bedroom?
So we decided that while it was still nice out, we'd get the flooring out so we weren't dragging the bags of demo materials to the curb in the snow. So...here's the results from the hallway:
Before...this is before we closed looking towards the living room
And the progress
I bet this is a new one for most people. At some point, someone found the rot in the floor. Rather than fix everything, they...poured concrete in the rotted area. Yup. Concrete.
All the rotted stuff is out, this is the concrete slab we sit on.
The floor
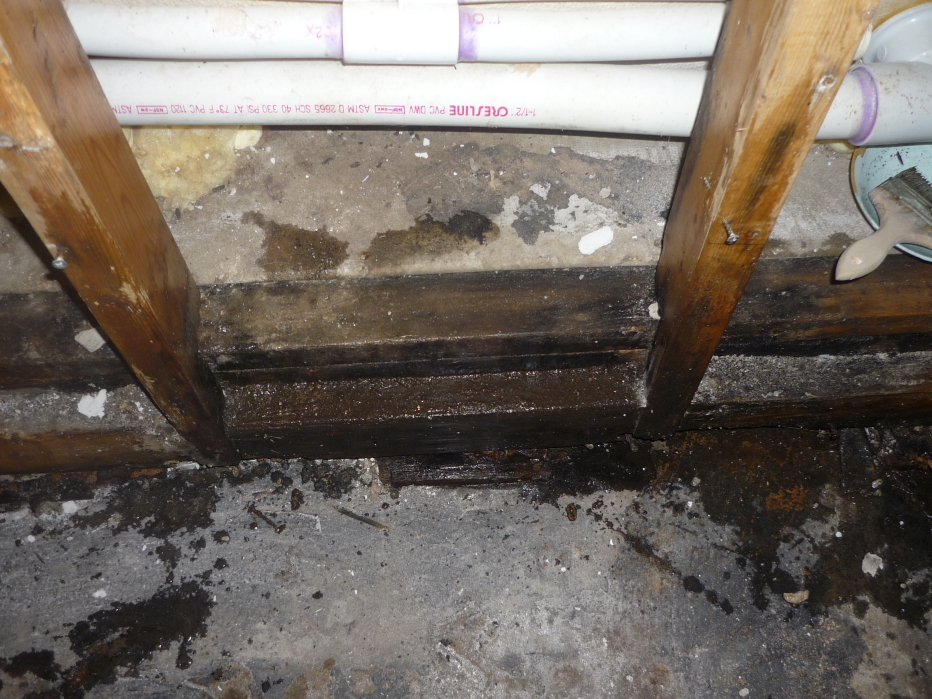
Mold on the wall. The tub leaked. For a LOOONNNGGG time.
Took out the moldy drywall. You can see the long standing water damage.
This is one spot where the water ran down.
I have treated all of the mold with vinegar.
We didn't stop with the hall. Major props go to Mr Eclectic for this part-he did all of the linoleum removal in the dining room and kitchen.
This was the dining room before we moved in. It was faux wood adhesive "planks" The enterprising person that laid it did so end to end rather than staggering the joints. It looked ridiculous.
You can see the floor that was below it in this picture, it was worn but kind of fun-faux brick. Too bad it had MAJOR adhesive (the black stuff all over the floor below). That'll be "fun" to remove.
This is the floor in the kitchen now, the dining room is the same.
or stained a little, like these
Before...this is before we closed looking towards the living room
And the progress
I bet this is a new one for most people. At some point, someone found the rot in the floor. Rather than fix everything, they...poured concrete in the rotted area. Yup. Concrete.
All the rotted stuff is out, this is the concrete slab we sit on.
The floor
Mold on the wall. The tub leaked. For a LOOONNNGGG time.
Took out the moldy drywall. You can see the long standing water damage.
This is one spot where the water ran down.
I have treated all of the mold with vinegar.
We didn't stop with the hall. Major props go to Mr Eclectic for this part-he did all of the linoleum removal in the dining room and kitchen.
This was the dining room before we moved in. It was faux wood adhesive "planks" The enterprising person that laid it did so end to end rather than staggering the joints. It looked ridiculous.
You can see the floor that was below it in this picture, it was worn but kind of fun-faux brick. Too bad it had MAJOR adhesive (the black stuff all over the floor below). That'll be "fun" to remove.
This is the floor in the kitchen now, the dining room is the same.
Another option, instead of trying to remove all that residue and patch in something in the hall, would be to completely replace the floor. In the process, we could replace/repair the "sleepers" (small pieces of wood that sit between the concrete slab and actual wood floor to keep the floor raised up and give something to nail it to) that seem to have given away in some spots in the kitchen. This is an option, light pine floors:
or stained a little, like these
Thursday, September 20, 2012
Bedroom Updates, and Crates
We're moving along with the bedroom!
Here are some pics of the progress:
Before paint on one wall, you can see the tiger strip look to the plywood paneling
This was test crackle. We decided against it though:
This is the walls painted but before the floor was. It's a little dusty in the air
The floor, pre paint
Painted floor
Painted plywood plank walls
Have I mentioned lately that I *LOVE* vintage crates? I don't think so...so I think I should! So, here are some of our vintage crates...
Here are some pics of the progress:
Before paint on one wall, you can see the tiger strip look to the plywood paneling
This was test crackle. We decided against it though:
This is the walls painted but before the floor was. It's a little dusty in the air
The floor, pre paint
All painted! We need to cut down more plywood planks for the bottom, but the rest is all painted. This is basically done though-from nearly the same angle as the before:
Painted plywood plank walls
Have I mentioned lately that I *LOVE* vintage crates? I don't think so...so I think I should! So, here are some of our vintage crates...
Sunday, September 16, 2012
Break from the bedroom
So we're still working on the bedroom, but I took a little break to get a few little odds and ends painted while we were still being blessed with nice weather.
First up, one of the 3/$1 chairs. This is going in the dining room. All four chairs are mismatched and painted differently. Currently some of the bedroom "parts" are also hanging out in the dining room (remember we're less than 700 sq ft here!) so no pics of that room.
Here's the chair before
I used what I can best call a "dry brush" painting method on it. I meant to have a darker green, the color on the lid DOES NOT match well to what's in the can, in my opinion. Oh well. Here are some during photos
And after
And a few videos to show how I did this. It's funny, I didn't speed them up but it seems like it. The second one shows how little paint I actually put on the brush!
I didn't stop with the chair, which may or may not be the last of the four we need. The jury's still out on one of them, as it's shorter than the other three. We'll see. Anyway, there has been a succession of various things next to the front door to use as a spot to place things, like a bag or purse, when walking in the door. Originally we had nothing. Then we had a treadle base, which was too big. Then there was a crate, which seemed out of place in the dining room. Now we have a small vintage table, which made it's way over from our old house. IF my memory serves me correctly, this came from Mr Eclectic's family. I know we've had it around for a number of years no matter what. One thing I've never loved was the color, but it's last home was in a room with some yellow in the wallpaper so it more or less matched.
Here it is
It's got great details
I noticed while I was painting it that someone, well before we got it, used scotch tape to fix a cracked leg. It never came apart during the at least 15 years in our possession, so I painted over it! Here's the final result
First up, one of the 3/$1 chairs. This is going in the dining room. All four chairs are mismatched and painted differently. Currently some of the bedroom "parts" are also hanging out in the dining room (remember we're less than 700 sq ft here!) so no pics of that room.
Here's the chair before
I used what I can best call a "dry brush" painting method on it. I meant to have a darker green, the color on the lid DOES NOT match well to what's in the can, in my opinion. Oh well. Here are some during photos
And after
And a few videos to show how I did this. It's funny, I didn't speed them up but it seems like it. The second one shows how little paint I actually put on the brush!
I didn't stop with the chair, which may or may not be the last of the four we need. The jury's still out on one of them, as it's shorter than the other three. We'll see. Anyway, there has been a succession of various things next to the front door to use as a spot to place things, like a bag or purse, when walking in the door. Originally we had nothing. Then we had a treadle base, which was too big. Then there was a crate, which seemed out of place in the dining room. Now we have a small vintage table, which made it's way over from our old house. IF my memory serves me correctly, this came from Mr Eclectic's family. I know we've had it around for a number of years no matter what. One thing I've never loved was the color, but it's last home was in a room with some yellow in the wallpaper so it more or less matched.
Here it is
It's got great details
I noticed while I was painting it that someone, well before we got it, used scotch tape to fix a cracked leg. It never came apart during the at least 15 years in our possession, so I painted over it! Here's the final result
Subscribe to:
Posts (Atom)