Tuesday, November 22, 2016

Stuff at the Cottage

We finished off our sunporch!

mudroom side


den side


A cat decided to join the family last year, she showed up in our yard in October and adopted us.

The Old House

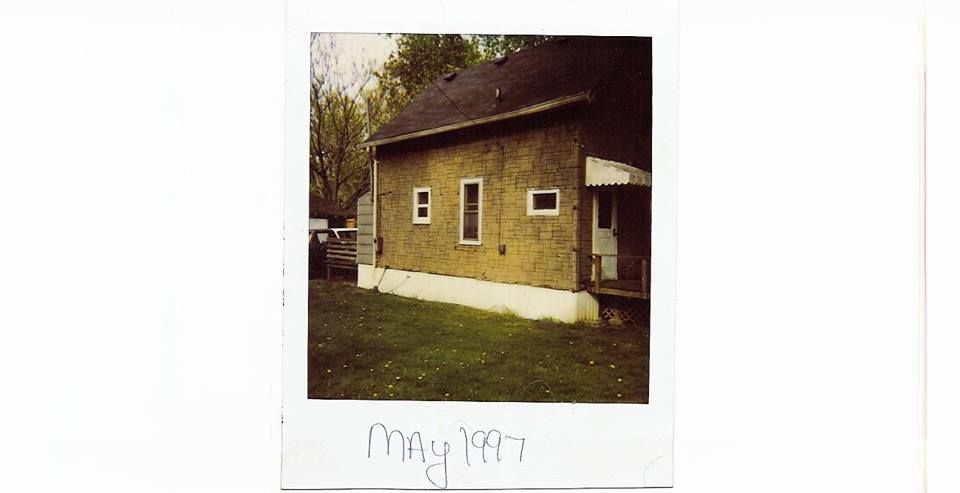
I never posted pics of The Old House outside.  It's been sold to the tenants now.

Here's the befores:


And after, had to use the onfile image for it, it is really cuter in person


Thursday, April 9, 2015

Cottage Pie

That's really what it's called. We made it for dinner tonight. It's easy and yummy. When we make it, we use an older enameled cast iron casserole. You can adjust to your size pan.

1LB ground beef. We used 90/10 organic
1/2 bag frozen peas
1/2 bag frozen corn
3 medium potatoes
1 onion
Parmesan and romano cheese, grated

Chop the onion. Put in frying pan with beef and cook, season to taste (tonight I used: salt, pepper, onion powder, a pinch of ginger, turmeric, cayenne, dill and marjoram). Boil the frozen veggies until hot, strain. Cook the potatoes, mash. Layer into the pan-meat, veggies then mashed potatoes. Sprinkle top with cheeses. Bake for 20 minutes at 350 (in our oven, that's 350ish). Done. Yum.


Wednesday, March 4, 2015

I can't believe I didn't know this

So I found this on Pinterest Growing Luffas blog post and I still can't believe it. How did I not know that Luffas are grown on vines, and that I could grow them?! For some reason I thought they came from the ocean, like some type of sponge. Well, now I will have to find some seeds to start and try to grow them this year. Because who WOULDNT want to grow a luffa? Amazing.

Monday, February 23, 2015

Heating with wood...oops.

So, one of the biggest adjustments to heating with wood is a lack of a thermostat.  While for the most part it means you need to do some work to have heat (the stove doesn't have a gas or oil line feeding it like a furnace, YOU have to feed it), it also means that you have to control the temperature by controlling the amount of wood and air.  It's been pretty cold here lately.  Single digits, negative digits.  Like -10.  Air temp.  We got pretty used to that.  However, recently we had a little break (it's over.  It's -3 right now) and hit 20's.  Great, right?  Except we got a little too used to 2 instead of 22.  And it was 83 in here.  Oops. 


Well, it's better than being cold, right?

Monday, February 16, 2015

Happy late Valentines!

I hope everyone had a great Valentine’s Day! We ate at our favorite place…the Cottage. We do go out on occasion but the more we cook the more we find we are less impressed with the food we get when doing so. Dessert was fantastic, so I’ll share a photo and the super easy recipe:


Fried dough with strawberries and ice cream Yes, you can make fried dough at home and it’s easy. You might be wishing I hadn’t told you that. It’s pizza dough that you fry. Simple as that.

Here’s the recipe we use for the dough:

http://www.pizzacrustyeast.com/Detail.aspx?id=8abc6c42-6877-4d25-9254-99ada3ddf285 (buy the pizza yeast if you can find it.  Much less yeasty)

Crust:
1-3/4 to 2-1/4 cups all-purpose flour
1 envelope Fleischmann's® Pizza Crust Yeast
OR Fleischmann's® RapidRise Yeast
1-1/2 teaspoons sugar
3/4 teaspoon salt
2/3 cup very warm water (120 to 130°F)*                     


Combine 1 cup flour, undissolved yeast, sugar and salt in a large bowl.  Add very warm water and oil; mix until well blended, about 1 minute. Gradually add enough remaining flour to make a soft dough.  Dough should form a ball and will be slightly sticky. Knead** on a floured surface, adding additional flour if necessary, until smooth and elastic, about 4 minutes.  (If using RapidRise Yeast, let dough rest at this point for 10 minutes.)

*If you don't have a thermometer, water should feel very warm to the touch.

**To knead the dough, add just enough flour to the dough and your hands to keep the dough from sticking.  Flatten dough and fold it toward you.Using the heels of your hands, push the dough away with a rolling motion.  Rotate dough a quarter turn and repeat the "fold, push and turn" steps.  Keep kneading dough until it is smooth and elastic.  Use a little more flour if dough becomes too sticky, always working the flour into the ball of dough.

The strawberry topping is equally easy:
Cut strawberries into small pieces. We used frozen organic since our garden didn’t give us enough to keep this past summer. We’re moving them this coming spring, it seems like they get too much shade.
Sprinkle with sugar to taste. You don’t need a lot. I used about a ½ teaspoon for 5-6 berries. Microwave for 1-2 minutes (I was close to 2 minutes because ours were frozen)
You can add a little corn starch to thicken the juice, but you don’t need to. I didn’t.

We bought the ice cream. We’ll be venturing into the realm of homemade ice cream soon. Too many “natural flavors” in everything anymore. I imagine whatever they are, they aren’t good or they would listed as what they actually are.

Once your dough has proofed and risen, roll it out. You can leave it in a single big piece (size to fit your fryer so that it is all in the oil at once) or cut into smaller pieces. Heat your fryer oil to frying temperature. We don’t have a thermometer so I can’t say how hot it is. If you don’t have a fryer, you can use a pan-we use a deep cast iron pan as a fryer. Drop the dough into the oil carefully-don’t splash yourself with the oil, it’s hot! Let it cook to medium brown on each side-it doesn’t take long to cook so watch carefully. We use a pair of tongs to flip it. It only takes about a minute total to cook so you aren’t going to want to walk away from it!

Remove the fried dough from the heat and put on a plate. We sprinkled a little powdered sugar on ours, then poured on the strawberries and added a couple scoops of ice cream. YUM!

We only used half of the dough for fried dough. You can store it for a few days in the fridge, but we made a pizza with the other half of the dough. We made it in a standard size cast iron frying pan.

 Here’s the pizza:


As you might have noticed, we’ve been cooking a lot lately. Well, it’s cold. Still. Sunday AM it was -4 air temp. Right now as I type this at about 9:30 pm on Monday it's -7. AIR temp.  I don't want to look at wind chill.  -7 is cold enough.  That pretty much puts a damper on anything outdoors. About all that’s been happening outside is plowing snow and bringing in wood. I should post some pics of that. We have a little Ford 120 tractor to plow the snow. I’ve also been using a flying saucer (sled) to bring the wood to the house. There’s enough snow that it’s easier than tramping through it carrying it. Plus I can bring more per trip!

Saturday, January 10, 2015

Goings on about the Cottage

It's been rather cold out around here for the past week. As of right this moment, it's 18 and I just actually said out loud "hey, it got warm out-it's 18". Yeah, it's been cold. That means it's a perfect time to cook and bake! Right now there is fresh bread in the oven and we're softening up some kidney and great northern beans for chili. We just pulled some hamburger soup off of the stove and we're soaking some dried lima beans for vegetable soup. The hamburger soup was pretty easy to make, and it was pretty good. We might add a little more spices or garlic and onion powder next time.

Here's the recipe:
a dash of olive oil
a pad of butter
(those two are to taste)
1 medium onion (chopped)
1 clove garlic (chopped)
1 1/2 pound ground beef
32 oz tomato soup
32 oz beef broth
1 1/2 cup of ditalini pasta
1 1/2 cups of corn (we'll probably add a little more next time)

In a skillet (we use cast iron), warm the oil and butter, the add the chopped onion and garlic, cook down until soft. Add the ground beef and cook until browned. In a soup pot, add the tomato soup and broth, bring to a simmer. Add the onion, garlic and beef. In another pot, cook the pasta. Add the cooked (and drained) pasta and corn (we used frozen) to the soup pot and simmer for another 10-15 minutes. Done. Easy peasy and yummy!!

Here's the soup. Sorry, I didn't do a whole photo shoot set up but you get the idea!

 
The bread (I'll have to get the recipe from Mr Eclectic, he is the baker here) This is an enameled cast iron pan. We also have a regular cast iron bread pan that's from Lodge. The enameled one came from a yard sale for $10, and also has a lid. It's Klafrestrom. We have a smaller version as well, that we picked up at an antique shop for $5. What a deal! It has risen:

 
And it's in the oven:

 
So here's an illustration of just how cold it is. This is the storm window in the kitchen. Nice view, huh?

 
Despite the cold temps we don't have much snow-the grass is visible pretty much anywhere the wind could blow the snow away. I'd like to see a few more inches so that the gardens have a "blanket" to help insulate against the freezing temps. The ice has grown on the lake from pretty much a tiny bit on the shoreline to quite a bit floating about. I've got to recharge the batteries on my little camera, then I'll take a photo of that to add.

And now...the finally food tally of the day!  Bread is out and done, chili is cooking in the slow cooker.  We made roast beef and roast a whole chicken.  That is one of our favorite meals.  So easy.  One whole chicken in a cast iron dutch oven for an hour and a half at 350. Tomorrow the rest of the chicken will become chicken pot pies and or chicken soup (after I boil the bones for stock).  We'll also make the vegetable soup and maybe some chicken nuggets to freeze (also easy-bread some cut breast or thigh meat and bake at 350 for about 20 minutes, then cool and freeze for quick meals later).

Wednesday, December 24, 2014

Cottage Christmas Eve

A new tradition we started when we moved here was to walk on our beach on Christmas.  We're forecast to have some high winds beginning tonight so we went for our walk this morning!  Along the way we picked beach glass (and beach pottery) to add to our collection, including one really nice green piece:


What a difference from last year-it's in the 40s and going into the 50s.  I don't know how people live where it doesn't snow.  Heat Miser can go home now.  I was hoping for a white Christmas.  At least I got white beach glass!


Just a short post for now, we've got to get the ribs in the oven then into the slow cooker so they're ready for dinner tonight.

Monday, December 22, 2014

Christmas Ornaments

Again, long time no post!  Still cooking up ideas for the not the New Old House, but the holidays have pushed that aside for now.  After all, we didn’t buy it so I have time.
 
What we did do, was buy a small vinyl cutter.  Several years ago, we had a large professional one, along with a heat press that we used to make and sell t-shirts and the like.  We’ve sold that since there just isn’t room at the Cottage for a 4’ long cutter.  We picked up a little “hobby” cutter that allows us to cut our own designs.  So of course we had to use it right away!
 
We made homemade raisin bread for friends that we dropped off on Saturday, but I wanted something different for my co-workers.  So many of them are crafty and I have a small collection of adorable decorations from over the years.  I wanted to return the favor with something we made.  So…we made some neat wood slice ornaments.
 
The wood slices were easy.  We walked out to the wood racks and selected what we refer to as a “little log” that had been seasoning for several years (little logs are 3-5” rounds, the limbs from trees that are a bit too small to split but too big to leave behind as junk).  Mr Eclectic promptly cut it down with a chop saw into slices about ½-3/4” thick and drilled holes for stringing them.  I found some snowflakes in our clipart collection (commercial use) and he cut them out on white vinyl. 
 
He weeded the “junk” vinyl (the part that’s left after the design is cut out) and I placed them on the slices (using tweezers to peel them off of the backer).  Then he cut out “Let It Snow” and weeded that while I strung them with twine.  I placed the letters on the backs of about 3-4 slices before letting him finish, I loved the snowflakes but the letters frustrated me.
 
Here’s the result:


Cute huh?  Now…what to do next year…hmm…

Wednesday, November 26, 2014

Still no new old house, but...

So we recently looked at another property.  We didn't make an offer but I thought I'd share some of my thoughts anyway.  You'll have to use your imagination since there won't be an after.

It had an odd layout.  It's a late 1800's home with an addition.  Master bedroom downstairs off of the kitchen, with one bedroom upstairs that's accessed with a walkthrough room.  The kitchen is an eat in with a vaulted ceiling.  The outside is perfect and really reads as an older home.  The inside, not so much.

Here's my first "project", the master.

This is the "bathroom" (obviously unfinished).


This little shower is in the back right corner.


I would remove the shower and closet area. 

There would be bead board on the walls and a claw foot tub lengthwise along the back wall.

Along these lines for colors


Maybe even the basket weave marble floors.

Now, this is the master, the bathroom is in the back left corner-you can see the open door.

 
Nice view, huh?  Between the bath and bedroom, I'd add a two sided fireplace.  This is why the closet space was getting lost.  Imagine soaking in the tub with a nice fire on a winters night! 


The door swing would have to change, but that's no biggie.  Probably have to go with a pedestal sink because there wasn't much room for a vanity.


Hope your imagination is working! 

The access to the laundry/basement is off of the master.  AWKWARD.  We'd steal a couple feet and make a closet, then move the access to the kitchen.  Otherwise the master only needs the popcorn ceiling scraped, new floors and paint.  The master is an addition.  The original house has wide plank floors under carpet and vinyl.  If those are in good shape, we'd need a different floor in the master.  If they aren't, we'd match them throughout the downstairs.

I'm thinking like this


They are new wide plank pine.  Good feel and we could match throughout the house since we can buy as much as we need.

Oh, and that fan's gotta go, not sure on a light fixture to replace it with yet though.

Can't pick colors exactly without chips to see how the light in the room effects them.  Something in the sagey/blue/gray family.

Next is the kitchen.

Heres what it looks like.

Main kitchen area


Eat in area, to the right of the bedroom entrance

 
Stairs to the second bedroom/floor and main bath.

 
Entrance to the master from the kitchen.  Ok, kinda weird.
 

I'll post my thoughts on a redo here next time.  The yellow won't be staying.

Saturday, November 15, 2014

Some new vintage finds!

We visited an estate (household) sale today.  We picked up a few cool finds.  I originally found it online and saw a Chiffarobe I wanted to check out, but it was gone.  So it must have been a reasonable price.  Usually great antique furniture like that is so over priced.  I'd like a waterfall style.  Kind of like this one:


What we got instead was...

A Juice King JK-30.  Needs a repaint.  We already have a vintage juicer, it's a bit smaller.  WE like it a lot, but there's a crack in the side and we're afraid one day it will grow into one that makes it unusable.  So we picked up a spare!  I'd say it's a 1950's era.  Fits right in.

A Becky Porter commercial french fry cutter.  This is going to need a serious cleaning and repaint.  But how cool is it??  I think this is a bit older, possibly more 30's or 40's era but I can't really say for sure.

Lastly, a 1970's era book on wood burning.  Not really for learning how to, but still neat to look though.  AND wowzers, it says an average homesteader might use 8-10 cords of wood per season.  CORDS.  Not FACE cords.  CORDS.  For those that don't know, a cord is 4' high x 4' deep x 8' long.  A face cord isn't a legally recognized measurement, but it's about 4' high 8' long and 16" deep.  10 cords is a LOT of wood.  I'd say in the range of 3x what we use. 

Here's todays goodies:


I have to round up some of our vintage goods we procured while on our Anniversary vacation and get some photos.  We've got a great stove top "EZ Corn Popper", a Corelle stove top as well as electric perculator, a Kliban cat, a neat thermometer and some cook books including Ma's Cookin Mountain Recipes which had a great biscuit recipe.

Thursday, November 13, 2014

A touch of snow and cooler weather!

We had a dusting of snow today.  I think it's about time to harvest the last of the lettuce that self seeded from the spring crop!  We've been sharing with the neighbors, since there's a LOT of it, but I'll probably bring some in to work (if I remember) since it doesn't really keep that well.

Along with the snow, came the cooler weather.  I wouldn't call it cold, yet.  Right now it's 30 degrees and it's been in the lower 30s all day.  What's exciting about that is we haven't had to burn 24/7 yet.  We had a door blower test done about a month ago, and it illustrated the leakiness of the Cottage.  We spent some time finding the leaks, and Mr Eclectic (who's far better at it than I am) sealed them up with silicone.  We also laid attic blanket in the attics (this we both participated in).  Technically our wood stove is oversized for our square footage.  The Republic 1750 (tube stove) is rated for about 500 to 1300 square feet MORE than the size of our house.  Shoulder season might be more challenging now!  While we did stop in to a Blaze King (cat stove) dealer and scope out the Sirroco and Ashford, I think we're going to keep the tube stove around for a while and try to learn how to keep ourselves warm but not too warm.  Now you're wondering what "cat" and "tube" stoves are, right?  Both are ways to burn the gases that the wood emits while burning.  We've only ever had one stove so I can't really say from experience but from reading (a lot), cat stoves (especially BK) are more controllable and can be "turned down" more for longer burns and a lower stove (and house) temp.  BUT, the tube stove has a nicer flame show from my understanding.  In my opinion, whats the point of a wood stove with no fire.  One of my favorite things as a kid was when everyone stayed at my grandparents house and I got to sleep in the living room on the air mattress-in front of the fireplace.  Best ever.  I'll have to post more about that some time. 

Right now we're burning box elder.  I just brought a few bags of it in tonight.  I think the yellow jackets like it more than some of the other kinds.  Here's a tip-if you store your wood outside, knock the splits together as you bring them in to knock the "sleeping" (cold/hibernating) yellow jackets off. 

Monday, November 10, 2014

Still Looking (The Next Old House Part II)

So at the moment we haven’t procured another rental, or even a house that would make a good rehab/resell.  We’re looked at some places that need pretty significant repairs, far above the end value of the place.  We’ve looked at a few that aren’t too bad and even made offers only to be outbid…it’s all a numbers game at the moment.  What I have found is that there are a lot of great photos on Pinterest that, should we ever find a place, I will have something to show Mr. Eclectic to help illustrate my thoughts (he’s a visual kind of guy).
 
What I also found is there are some photos of things I wish I could have here at the Cottage!  There are three things I wanted in a house for years and years and years that just aren’t going to happen here. 
 
They are:
 
#1.  A Hoosier, or multiple Hoosiers (in a completely unfitted kitchen with an awesome porcelain sink with a gingham or checkered sink skirt).  Ok, they didn’t have to be the Hoosier brand, but that’s what most people call them.  I tried to figure out for years how to fit one in at the Old House, and while I eventually figured we could probably put one between the kitchen and dining room I never did get one.  It would have made it dark(er) in there and it was already dark enough due to numerous trees and the orientation on the lot.  And now, there is absolutely NO place in my kitchen for one.  At best, I might be able to get a small enamel topped bakers table, if we ever wanted to get rid of the microwave cart (the ugly thing I painted green which I previously posted about).  Not really a Hoosier, there’s no awesome flour bin or general old school unfitted kitchen goodness, but it would have that great top.  And be real wood not press board.  And be old.  Because if you haven’t figured it out yet, I like old stuff.

Hoosier:
 
 
#2.  Wood cook stove.  You know, those huge heavy monsters.  Yup, one of those.  I have absolutely NO idea how to cook on/in one, but I would be happy to learn.  Now, mind you, I didn’t want to replace my “modern” (relatively speaking) stove with one.  I like being able turn a dial and light a burner, or light a match and have the oven working.  We had seriously considered a reproduction electric range that had that old wood cook stove look while at the Old House, but the cost was too high to justify the cool looks.  Again, with our smaller kitchen here, this is not going to happen.  Unless we build an outdoor canning kitchen at some point.  However I don’t really know where we would do that.  But if we did, I’d want one of those cool old stoves-preferably delivered!
 
#3.  Claw Foot Tub.  I really don’t know exactly what it is about them, but I want one.  I found the most awesome (to me) bathroom with one on Pinterest.  I can’t be the only one that thought so though, because it’s been repined 100’s of times.  It combines not only a claw foot tub, but also brick (floors) and a whole cottage chic look that is so absolutely awesomely amazing it’ll knock your socks off if you’re into that style.    In fact, I’m going to post it below just so you can see it.  Get ready to drool.  It’s that sweet.  I would settle for the tub and brick floor.
 
 Ready?
 
Here are two views


Not to say that I don’t love my kitchen…and dining room…and living room…and laundry room…and bedroom…and bathroom (although that claw foot tub would make it even nicer, lol).  Good thing someone invented Pinterest so I could scope out cool stuff and keep it on my boards like an old school scrap book.  I might not have them in my house but I can have them digitally!  AND I can store up all sorts of great ideas and looks for that time when someday, some way, one of our bids is accepted and I have a whole new old house to redecorate and design.

Wednesday, October 8, 2014

Regrowing onions and Goji berries are ripe!

I mentioned that you can regrow onions from the cut off end.  Here's one that we've started. 


Just cut the end off where the roots were and put it in water.  Soon you'll see little green stalks sprouting out.  Eventually you'll need to plant it.

Our Goji berries are starting to ripen!  I'm not so sure I'm going to like these...Mr Eclecic tried one and said it tasted kind of like a tomato.  I am not big on eating tomatoes just by themselves.  They make great sauce, but picking one and eating one...ick.

Here are ripe Gojis.


I've been meaning to post this too, but I forgot, so here it is:

The simplest easiest yummy oatmeal cookie crumble thingy.


I can't give you exact measurements because I don't measure anything when I do this, sorry.  But it's easy anyway!

Rolled oats.  About 2-3 cups
Dark and white chocolate chips.  About 1/4 package each.  You can use whatever kind of chocolate you want, or even leave it out.  I like it to add some sweetness to the cranberries.
Cranberries.  About 1/2 package.  I also threw in some raspberries and blueberries from our garden.  I'd say you could use whatever berries you'd like.
About a teaspoon of Vanilla.
Brown Sugar.  About 1/8 cup.  Really, really little.
Coconut oil, melted.  About a table spoon.  Just a bit.

Mix everything then add just enough milk to moisten it and get it stuck together.  Spread onto a cookie sheet.  If you don't want it super crunchy you won't need to grease it.  If you want it crunchy, grease it!!  I spread it just about the thickness of the cranberries.  For less crispy, it bakes in our gas oven from cold (not preheated) for about 25 minutes on 350.  We just made it pretty crispy in a preheated oven at 400 for 20 minutes.  Makes for a great breakfast to take to work or as a snack.

Sunday, September 21, 2014

Winters A Comin'

The past two days have been breezy and warm.  I'd like to think it was nature's way of apologizing for nights that almost dipped into the 30s, but I'm thinking it's more of a nice exit for summer in front of another cold winter.  Yesterday we spent some time making ready for winter's approach.

We (and I do mean Mr Eclectic) fixed some roof shingles that had blown away.  I worked the "ground crew" position, fetching tools to bring up the ladder and weeding between the raised beds when not needed.  He removed the torn leftovers and nailed in 5 new shingles.

We also got our little Ford 120 tractor moving again.  I participated in the removal of sludge and shavings from inside the tranny casing, he drilled out a broken (by the PO) bolt, tapped in a helicoil and made a gasket.  Then it all went back together, we fetched some transmission fluid and found out the "extra" gas tank we were given had the gas filler cap in a different part and it didn't line up with the hole on the hood (to be dealt with at a later time-the tank from the tractor has 3-4 pin holes in the bottom.  Not good for holding gas).  Ah well, it's over 40 years old, it's bound to have some misaligned parts!  It did crank right up.  Now we'll work on getting the snowblower attachment hooked up and see if it's ready to throw some snow for us and the neighbors this coming winter.

AND there was also the flue and stove to be cleaned.  Yes, this should have been done in May or June, but it's been a busy year!  When we clean our stove, we try to be thorough.  We remove all of the bricks, and wire brush the ash and creosote behind them off as best as possible.  Then the flue gets swept and all the ash shoveled out of the shove.  The bricks get brushed off and reinstalled.  We clean the glass, do any paint touch ups, re-adjust the door and we're ready to go.

Here are some pics of that process.

Fire bricks out (we use a drop cloth to spread them out on, in the same pattern they came out)


If you have a woodstove and clean your own flue, here's a tip (let's not talk about how we came to decide this was a good idea).  Tie a rope to the little loop on the top (bottom, really) of the brush.  If it happens to get stuck or somehow unscrew from the pole, you can pull it out rather than disassembling the flue.

Here's the rope sticking out of the flue into the stove


The brownish pile of ash is what came out of our flue after a while season's burning (remember this is our exclusive heat source).  Not too bad.

This is the flue after a sweeping


The cap is back on and ready to go!


All cleaned up and the bricks are back in


I know it doesn't look "clean", but once you've had a fire in a stove it'll never be "clean" again, in the way a new stove is.

Now if only it takes a few months before we need to get it "dirty" again...yeah, right!  We've already had a few night time fires to take the chill off.  Hopefully it'll at least be a while before it's burning 24/7!

Tuesday, September 16, 2014

Onions, drying basil and harvest time

We cleaned up our raised beds in preparation for next season for the most part already.  With nights dipping into the 40's production was about over for many thing.  One of the beds will now be for onions and garlic.  We have some really neat onions.  I got our first couple from a wonderful lady on Craigslist, then got some more from a plant swap a few years ago.  Unfortunately they didn't do well in pots over the past winter.  I was happy to find a few more from a random plant sale at a lakeside home in Charlotte (pronounced shar-lot, not like the one down in North Carolina).  Now what are these onions that I speak of?  Walking Onions.  Walking onions?!  What's that you say?  Well...they are onions that reproduce by...walking.  Well, not with legs.  They send up a "stalk" with little bulblets on it, and as the bulblets grow and get heavier the stalk tips over to the ground and "plants" new onions!  They have a very strong flavor.  We do still end up buying cooking onions sometimes-and yes, we know that neat trick to start new ones.  Just need a better place to plant them over the winter.  What's this neat trick you say?  Well, if you cut the end of the onion where the roots were off and put it in shallow water, it will start to regrow new "leaves" (stalks?).  Plant that, and you'll get new onions from it.  Neat, huh?

Here are the walking onions all freshly planted


I've begun to dry our basil.  We have some yummy Italian broadleaf basil that's been growing happily all summer in big pots on our back stairs.  Well, those night time temps will be starting to take their toll I'm sure, so I've taken some cuttings to restart new smaller plants and begun to dry the leaves that are left.  We don't have a dehydrator so I used our toaster oven.  I set it at between 150/200 and pulled out the crumb tray just a little for air circulation.  Once it got warmed up it took about 20 minuted to half an hour for each batch to dry.  Here's a few pics of the process


Our young pear trees are getting ready to give us a few pears soon too!


And our close to the cliff apple tree is loaded again this season.  Now I'm even more sure it's a Northern Spy.


It's almost harvest season for the farm across the road too.  The corn is getting tall!


This is a Goji Berry.  We planted this bush (?) earlier this summer.  We were told it wouldn't fruit this year.  Well...it did, but I don't think this will ripen before frost.  I'll keep an eye on it though.


I did say I'd post a pic of the living room wall with the drywall. We still haven't decided what to put against it or hang on it yet and we still have a bit of white washing to finish, but here it is.  Oh, the plants, those are pineapple sage.  Too cold for them now outside.