Well, it's official, the old propane range is in rather poor shape. We can use the burners, but the oven is out of commission. So...we are either going to need to use the toaster or the wood stove.
The wood stove is more fun. I made the cornbread in the dutch oven. Learned I had to shut off the blower on the stove, but after that, it cooked up nice. Absolutely perfect consistancy and crust. I am going to try some more things over the coming weekend and this time, try to remember to take pics. I would suggest anyone with a stove try this, it's neat-although odd to see a pot in the living room! Cast iron is the way to go, it's so even and consistant. We used the frying pan to make eggs and bacon, and they warmed up nice and were non-stick-more so than our stainless pans. Plus the bacon helped season the cookware too!
Tuesday, December 13, 2011
Monday, December 5, 2011
Uh, about that china cabinet...
It's a project in progress for now. In otherwords, I got side tracked! It's cleaned up and sitting in the living room, waiting for me to get the time to mess with it. For now, it's fine as it is-perfectly shabby and cottage chic!
I got distracted by our wood stove. We went to Tractor Supply on Black Friday for a couple of new jackets, and I saw cast iron cookware on sale. It got me pondering....could we just use our stove to cook on instead of the range? Well, we might just be doing that! We picked up skillets, a dutch oven and deep pan and I'm fixing to give it a shot. Especially after checking our propane tank and seeing it had dropped 10% in a week or so!! It seems our kitchen range may be on the way out, since we don't use the propane for heat. We're watching to see if it is just the oven or the range in general. In the mean time, I'm "cooking up" some recipe ideas for the stove, including chicken soup in the dutch oven. Lopi has a recipe on their site for frying pan corn bread, I might even try it tonight!
 Here's the cabinet as it sits:
I got distracted by our wood stove. We went to Tractor Supply on Black Friday for a couple of new jackets, and I saw cast iron cookware on sale. It got me pondering....could we just use our stove to cook on instead of the range? Well, we might just be doing that! We picked up skillets, a dutch oven and deep pan and I'm fixing to give it a shot. Especially after checking our propane tank and seeing it had dropped 10% in a week or so!! It seems our kitchen range may be on the way out, since we don't use the propane for heat. We're watching to see if it is just the oven or the range in general. In the mean time, I'm "cooking up" some recipe ideas for the stove, including chicken soup in the dutch oven. Lopi has a recipe on their site for frying pan corn bread, I might even try it tonight!

Tuesday, November 22, 2011
A New Project!
So I was going to blog about the paneling or other projects, but I've got a new project I'm excited about and hope to complete this week.
We were driving down the road and saw this china cabinet set somewhat near the road. Not on the curb though mind you. I LOVED it. But, no one was home and it wasn't at the street so we weren't sure it was really being thrown out. It was still there the next day, and there was someone home, so we asked. And he was throwing it out!
So we loaded it up and lugged it home. Did I mention the other half of the cottage crew (my husband) was less than impressed? I still loved it.
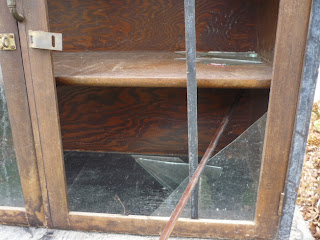
So, today in 30 degree weather, I washed it up (it was a bit mildewy and had barn ick). I wouldn't suggest washing your wooden furniture, but I wanted warm water...and it was pretty dirty. I plan to paint it in a shabby cottage style and replace the broken glass with chicken wire.
Here's my latest find, from the Paramount Furniture Company in Warren PA in as found condition:

It wasn't originally black by the way...check out how the laminate is peeling on the door:
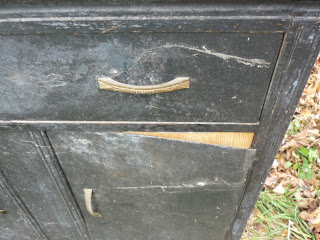
Look at the beautiful handle:


The original shipping label information with the model number:

We were driving down the road and saw this china cabinet set somewhat near the road. Not on the curb though mind you. I LOVED it. But, no one was home and it wasn't at the street so we weren't sure it was really being thrown out. It was still there the next day, and there was someone home, so we asked. And he was throwing it out!
So we loaded it up and lugged it home. Did I mention the other half of the cottage crew (my husband) was less than impressed? I still loved it.
So, today in 30 degree weather, I washed it up (it was a bit mildewy and had barn ick). I wouldn't suggest washing your wooden furniture, but I wanted warm water...and it was pretty dirty. I plan to paint it in a shabby cottage style and replace the broken glass with chicken wire.
Here's my latest find, from the Paramount Furniture Company in Warren PA in as found condition:

It wasn't originally black by the way...check out how the laminate is peeling on the door:

Broken glass:

Look at the beautiful handle:

See the detail work:

The original shipping label information with the model number:

Friday, November 18, 2011
Who needs a gym?
So, I've figured out one of the best work outs there is. Wood stoves (or fireplaces). Really. During the past summer, we picked up many, many pieces of wood either from free listings on Craigslist or dumb luck (driving by as someone put pieces of their cut up tree out to the curb). We figured (mostly) free heat is good. Generally speaking, most were about 16"-24" long and range in width from a few inches to are you kidding me (a few feet-very HEAVY in other words). We brought them home in our truck and "stacked" them next to the driveway. From there, we cut the bigger pieces with a saw (by we, I mean I moved them into a cutable position and DH ran the saw). Then we took all the log chucks and split them into firewood size (again, by we I mean I brought them all over to DH who ran the splitter). THEN I got to wheel barrow them over to our stacking area and stack them all. We put up several cords to season. And bought several more face cord (a common way to sell firewood in these parts. Face cord=4' high x8' long x 16"-18" deep whereas a regular cord is 4x4x8) of seasoned wood which we loaded into the truck, then unloaded and stacked.
If you are new to wood burning, seasoning simply means what it sounds like. Leaving your freshly cut wood to dry for a season or two. Burning unseasoned wood isn't good. First, it burns cooler so you get less heat. It's also a pain to get lit and keep burning, especially if you're going for a long burn time and damp down the stove or fireplace (which is really good for EPA type stoves to get a secondary burn going-meaning, you burn the smoke and get more heat and less creosote). Speaking of creosote, that's another downfall to unseasoned wood-you'll get more of it. Which is bad because it can cause a chimney fire and that can burn down your house. And nobody wants that!
I also ran across something called Eco Bricks while reading about good wood burning techniques and how to get the longest over night burn (we are using the stove exclusively for heat right now and we've had some nights in the 20s already). SO, we bought about 100 packs of them too, which needed to be loaded, unloaded and stacked (easier than cord wood though, 24 pound bundles wrapped in plastic, and in neat little rectangles).
And today I sent DH out to collect several truck loads of free wood again (I had to work, darn). I decided I didn't need a gym membership. I just needed a wood stove!
Tuesday, November 15, 2011
Jumping ahead a little...
So, I'm going to jump ahead of our MAJOR project of replacing the flooring and floor joists-remember what I said about foundation issues-and land here with building a natural lake stone hearth for our new wood stove. We put a beautiful Lopi Republic 1750 in to help heat the place, and to add romance to our living room. I always wanted a wood fireplace, but I'm more than happy with the stove!
We had a lot of options for a hearth pad. We could buy a premade one, or make one from tile or store bought materials. However, in the spirit of living lakeside as well as in the interest of being frugal (we won't say cheap, lol) we decided to take advantage of our own resources. Granted, we would need to buy the mortor and grout, but we could make it whatever size and shape we wanted AND save $$ on material costs vs buying tile, etc. Also, it would feel more connected to the location by using materials from our own front yard.
We built it bigger (about 6' long by 4' deep) than needed for clearances, to give us a raised place for wood storage. The base pad is simply 2x4's built in a square (there are two additional 2x4's inside of the square for support) and covered in Durarock.
We started by picking a LOT of relatively flat rocks and setting them out on the Durarock to get an idea of pattern and to see if we wanted larger or smaller rocks (the picture below shows the small ones on the left and the larger ones on the right). If you are building your own hearth pad, be sure to check your local building codes and the stove manufacturer's guidelines for clearances. We chose the Republic because it has a VERY close rear clearance (4" from back of stove to combustibles with a double wall pipe), and even though our living room isn't small, it isn't large either so we wanted to take up as little floor space as possible with the pad.

Once we had an idea of the layout, we set the stones using a mortor made for natual stone (there are different types, depending on how porous your material is). It wasn't really that bad once we got going, although getting it out of the bucket with the notched trowel was a bit of a pain, so I used a paint stick. What we did was get a pattern laid out for a general idea, then we took all of them off the pad. I know it sounds like extra work, but we wanted the basic plan laid out-did we want all bigger stones, all smaller stones, or a mix? We chose a mix. It would have been nearly impossible to lay them back in the same pattern, so it was just easier to take them all back off. Then we worked in 2' x 2' areas, toweling on the mortor with the notched trowel, then laying the stones into that. We did "butter" (put some extra mortor on the back side) some of the stones as well. I'd say this process took a few hours, and I was the only one laying them, to avoid two different patterns emerging (like certain painting techniques, everyone has a slightly different method of laying the stones). We then allowed the mortor dry for 3 days, per the instructions.

After all the stones were set in the mortor, we leaned a few pieces of our "reclaimed" paneling up against the wall to see how it would look. I am in LOVE with the paneling. I'll blog about that later, it's a take on white washing and pickling on natural pine, and it was done not only to lighten the room, but because we didn't have enough of the old paneling after doing some work in the room. It's done to resemble chippy, worn barn wood siding. There is an old barn we pass every day which has weathered white siding and it really reminds me of that.

Once the mortor was dry, we sealed and then grouted the stones. The sealing was simple-just paint on the sealer with a brush. This step was supposed to prevent the grout color staining the stones, and it did for the most part. Grouting still took TEN hours, even after sealing the stones!! Typically it wouldn't take this long to grout I'm sure, but because the stones are so porous each stone had to be "scrubbed" to remove the grout from them, then the grout had to be finished (I used damp rags for this). To grout, I used a rubber grout float that had some "give" and fit to the natural contours of the stones. We used a lighter grey grout called "Delorean gray" (yes, like the car from Back to The Future). Then we fitted the paneling in around the hearth pad after the grout dried (please excuse the "orbs" in the photo-there's still a good bit of construction dust floating about).

Once the grout was dry, we got the stove installed, and put a neat vintage crate next to it as a wood box. I *LOVE* old crates. If you follow along, you'll see them in other places too. The brass fireplace tools are also vintage. We picked up the crate for $2 at a garage sale before the whole crate frenzy took hold, and the tools were bought from an architectural salvage company many years ago (they used to sit next to our gas stove at our old house for that "real" look) for $20. We had the fireplace distributor install the stove, that was one of the few things we decided not to DIY.

We still have to finish the sides, but we're waiting to do that until we have the floors in. That will be a while, we've been using the sliding doors to bring in materials, so we figured we'd leave that until the end to avoid doing too much damage to them.
Thursday, November 3, 2011
And here we are...
Ok, I think maybe it's just time to make a long story short! We have begun work on the cottage and there are so many fun projects and ideas I want to share, so I think I'll just get to the point.
In early 2011, we decided to check on that one bedroom cottage with the out of town owner and foundation issues. We hadn't seen anyone there all winter and began to wonder if the sale we thought had happened fell through. So, we checked the tax records, and low and behold-same owner. We double checked with the county, but they also showed no record of a sale. So we decided to take a chance and write a letter to the owner. It took some time, but eventually we came to the conclusion that the cottage was worth it (the owner wrote back quickly, but his asking price and what we wanted to offer were way different, so at first, we back tracked and decided to keep looking). We did look at several other places in the mean time, which only helped cement our choice. After months of back and forth, lawyer and contract snags, we finally closed on the place in late September. It was a VERY odd transaction. We mowed the lawn and did the landscaping and maintainace on the cottage all summer long, beginning in July. In fact, we received the keys from the owner's brother's ex-wife (figure that one out!) in July as well, so we had access to the inside of the cottage during that time too (although we really just came in to use the fridge which had been left on anyway). We weren't even at the closing! I will probably add some details from this unusual sumemr later, but like I said, I want to get to the fun stuff. I mean, I'm working on cleaning up an old steamer type trunk and making curtains from drop cloths (looks rather like sail cloth) and I'd love to show someone all these fun things!
In early 2011, we decided to check on that one bedroom cottage with the out of town owner and foundation issues. We hadn't seen anyone there all winter and began to wonder if the sale we thought had happened fell through. So, we checked the tax records, and low and behold-same owner. We double checked with the county, but they also showed no record of a sale. So we decided to take a chance and write a letter to the owner. It took some time, but eventually we came to the conclusion that the cottage was worth it (the owner wrote back quickly, but his asking price and what we wanted to offer were way different, so at first, we back tracked and decided to keep looking). We did look at several other places in the mean time, which only helped cement our choice. After months of back and forth, lawyer and contract snags, we finally closed on the place in late September. It was a VERY odd transaction. We mowed the lawn and did the landscaping and maintainace on the cottage all summer long, beginning in July. In fact, we received the keys from the owner's brother's ex-wife (figure that one out!) in July as well, so we had access to the inside of the cottage during that time too (although we really just came in to use the fridge which had been left on anyway). We weren't even at the closing! I will probably add some details from this unusual sumemr later, but like I said, I want to get to the fun stuff. I mean, I'm working on cleaning up an old steamer type trunk and making curtains from drop cloths (looks rather like sail cloth) and I'd love to show someone all these fun things!
Tuesday, October 25, 2011
A Side Note
Before I get to 2011, I just want to say that eventually (and sooner rather than later) I will get on to the business of talking about the Electic Cottage, and show you the neat things we've done and bought and found. I like pictures too. Actually, whenever I get a new idea for something to try, I look online to see if I can find pictures of other people's attempts (for the better or worse). Like whitewashing pine walls, and using beadboard on ceilings. And of course, whenever we are going to buy something NEW (which isn't all that common, but some things I just want new, like electrical componants and our wood stove because we didn't want to install it, lol) it's nice to see them in use rather than the manufacturer's stock images. Even if we vary the idea (like our pickling whitewash that isn't really either and completely disregards the directions from Minwax on how to apply it) it's fun to see what others did. Then there's the great upcycling ideas like our wood crate wood box and totally trash picked display thing (I really don't know the proper name for it) in the dining room.
Anyway, if anyone out there in internet land is even reading this yet, I just want to let you know it won't always be words and stories (but there will be those too, like about the pine cone). So hang in there, especially if you like eclectic cottages, cottage style, or even nautical or shabby chic. Because we've got a bit of all that, as well as junkmarket (aka fleamarket) and antique shop style mixed with some architectural salvage and craigslist finds.
Anyway, if anyone out there in internet land is even reading this yet, I just want to let you know it won't always be words and stories (but there will be those too, like about the pine cone). So hang in there, especially if you like eclectic cottages, cottage style, or even nautical or shabby chic. Because we've got a bit of all that, as well as junkmarket (aka fleamarket) and antique shop style mixed with some architectural salvage and craigslist finds.
Thursday, October 20, 2011
Spring 2010
In the spring of 2010, a new listing popped up on the lake. A familiar address. It was the cottage with the out of town owner and previously frozen pipes.
So, we decided what the heck, we would call the agent. Wow. We've dealt with a lot of real estate agents over the years, and even held licenses ourselves for a while. This one was a winner for sure. He didn't even know the name of the town, he called it something completely else. And he didn't want to show it to us, he wanted us to come in two weeks when he had an open house. We almost didn't go after that call. But we did in the end.
And it was cute. And small. And had no basement, no garage and a wood stove. And foundation problems. Big ones. And smelled like mold. And wouldn't qualify for a mortgage, even though the agent thought it would. And...well, you get it.
But it was cute. So we filed it away in the "think about it" file. And went to another open about a month later, and asked if the agent would see if the seller would do an owner hold instead of a mortgage. And he blew us off, and messed around, and generally turned us off of the property.
We noticed the place from the year before was knocked down now, just like the a-frame a few years ago.
We decided to save enough to buy a place without a mortgage. And kept an eye on the pre-foreclosure. And as 2010 faded into 2011, we saw the sign disappear from the one bedroom bad-agent place with the foundation problems and out of town owner. A propane tank appeared, and a riding lawn mower too. Must have been sold...
Friday, October 14, 2011
Wha was that about reasons?
{continuation}
This vacant house was really just a cottage. And it was just a few more doors down. He told us it should be on the market soon, the owner was ready to sell. See, he bought it for his brother when his brother got divorced so he would have a place to stay. Then the brother moved away and the owner contracted the agent we were speaking to as a rental manager for the place. And the tenants moved out in the winter without notice, let the propane run out...and inevitably, the pipes burst. The agent assured us all that damage was fixed, and the out of town owner was fed up with it. But, he didn't have the keys. He figured the asking price would be lower than the one we were looking at too.
We decided to try to make a go at the place the agent showed us instead of the one he told us about, but we got a different agent this time. Why? Well, while the first agent was showing us the place, he kept trying to talk us out of it because we wanted to fix it instead of knocking it down and it was one of few buildable lots (due to minimum lot widths). See, he had some buyers that were looking for a buildable lot and the other place would be better for us anyway. That might not have turned us off, but seeing him SHOWING the place to those buyers later that day did.
So, the second agent showed us the two bedroom fixer again. And we found out he knew the family that owned that pre-foreclosure we had been saving for. And we started thinking everything happens for a reason...if the lake cottage didn't work, maybe he could help with the pre-foreclosure...
And that agent screwed us too-he never even put in our offer, and less than a week later, THAT property sold.
We gave up for the year. Maybe 2010 would be better.
Friday, October 7, 2011
Everything happens for a reason
We searched for years for a cottage on the lake. Well, really, it was a house we were looking for at first. After many years of working on our first house, we had some pretty specific things we wanted, and a longer list of things we DIDN'T want. We "needed" an attached garage, the bigger the better. It HAD to have a basement, we didn't want to deal with frozen pipes ever again. Our new house absolutely must have a fireplace as well. Not a wood stove, but a proper stone hearth fireplace. And three bedrooms. It couldn't have wood siding, or a gravel driveway either. Anyway, you get the idea.
The problem was, our budget wasn't that big. Well, that was one problem. Another one was the fact that there's only so much lake shore which means there's only so many abodes on the lake to chose from-and an even smaller percentage that are for sale at a given time.
So after a few years, we decided we could live with a cottage, and just make it what we wanted. We started to consider a place without a basement (gasp) or a garage-but it HAD to have enough room for a big garage to be built. And it still HAD to have a big fireplace in a big living room.
After a several years of fruitless hunting, we found a little place. It was an added onto cottage with no basement, but there was a two story garage, three bedrooms and a stone fireplace in a big lake facing bedroom. We met the owner's grandson, who was living there at the time. He didn't want to leave. He told us the story of the place, how it was originally smaller and how the family built it in the 40's and added on as the family grew and expanded. How his uncle made a common little cottage into a cute a-frame. And how the kitchen addition was built on the dirt, and the electric and plumbing didn't work in the upstairs, and how the foundation was shot. And how he had to leave because Grandma had to go into a nursing home and the state wouldn't allow her to have any assets-like the cottage.
We were overwhelmed with the work and the asking price, but we forged ahead and spoke to a mortgage broker. Who promptly told us that it would never appraise high enough for a mortgage. We were trying to get creative when our realtor called and told us the sellers accepted a cash offer. A year later the little A-frame was a pile of rubble and a new modular has sprung up in it's place.
Fast forward to 2009. We had given up on the lakefront and were now trying to buy a pre-forclosure. That is a whole entry in and of itself, and I promise to tell the story so far (we still keep tabs on it, and it still has no ending). We decided to forgo our usual vacation and rented a little place on the lake instead to save money towards our new dream house.
Have you ever rolled your eyes at the saying "everything happens for a reason"? Don't. Because it does. That crazy years long attempt at buying an abandoned house lead to us owning The Eclectic Cottage. And I have the pine cone on my desk to remind me of it (I'll tell that story sometime too).
How could that possibly lead to our piece of paradise?
Well, two doors down from our vacation rental was a cottage for sale. We had seen it before but deemed it not worthy of buying-it was in pretty rough shape (we thought). Well, we wandered down to look at it one day and found a pretty nice little place that needed some work, but was workable. And it had the requisite garage and at least two bedrooms So, we called an agent to show it to us. And he did. And he also told us a story about this vacant house...
Subscribe to:
Posts (Atom)