Sunday, December 30, 2012

The Hall...before and after

New old flooring, bead board, paint, ceiling, lighting and doors!

The before and after reveal...we do need a few details finished, but it's much better now!


New old door!!  LOVE this door.


We are still not sure what to do with the bead board, neither of us really want to paint it, or make it darker, but it is a slightly ackward transition between the darker existing kitchen paneling and the new in the hall:


Thursday, December 27, 2012

One of my Christmas gifts this year!

This year we decided to give each other mostly useful gifts.  YAY!  When you have a small house, clutter is NOT your friend.  There's some really great new stuff here I'll have to post about, like an antique cast iton waffle maker.

THIS, though, is one of my favs.  I specifically asked for one, which is probably good because mr eclectic has never heard of them until now.

I got a defroster for the Norge!!  It's not automatic of course, lol.  It's a nice vintage electric one.  Happily, I haven't used it yet because I had just defrosted it about a month ago and it doesn't need it yet.  I'll post about using it whenever I get to that point.  No worries, I am SURE it will need defrosting eventually.

Here is is, it came with the original display box!


Sunday, November 25, 2012

Dining room!

We're still not sure if we're going to paint the bead board (white) or leave it.  

Here are the before and after photos!


Monday, November 19, 2012

Backsplash is done

The kitchen is coming along!  We have some trim work yet to finish, put some "bricks" behind the fridge where they left drywall for some reason and we need to finish the floor.

Here's the before and after to compare:


We are also making progress in the hall.  These are our new old doors.  You can see the beadboard too.  The doors came from an old farm as part of an estate-they were in the barn for a LONG time, we got them before a local guy that makes benches, corner cabinets, etc did.  We will have to add a little wood to the top and bottom of one to make it fit because we can't shrink the frame down.  That's the one that's not hung yet.  Love the REAL crackle, although it will need repainted to hide the new wood.


Tuesday, November 13, 2012

The first brick panel is up!

The first panel is in.  Needs to be trimmed out, but it's a step in the right direction!


Monday, November 12, 2012

Odds n Ends

Shutter dogs have arrived!  These will hold the shutters closed on the "closet doors" in the bedroom


Really "awesome" job on the wiring in the kitchen.  NOT.  Rather than drill through the studs they just ran it on the outside and worked the drywall around it.


I'll get some more pics as we get going.  Faux brick is in the "house", as is the beadboard for the dining room and hall.  Also, wallpaper has arrived for the hall.  Fun stuff coming up here!

Wednesday, October 24, 2012

Working on the floors

We decided to hand plane the adhesive off.  The steamer didn't really touch it, although it did work well to remove the patches of linoleum that didn't want to come up.

Here are some in progress photos


With some boiled linseed oil applied


Monday, October 15, 2012

Remember this floor?

This is the old barn floors we originally bought for the bedroom, finding a new home in the hall after a run or two though the planer.  Still needs a BLO/Turp mix applied...and to be finished of course!  We put down a layer of tar paper, then sleepers, then the floor.


We did a little test on the kitchen floor to try to remove the old adhesive from the floor using mineral spirits.

Before


After


Needs some more work.  We are going to try a steamer next.  Mineral spirits are stinky and it's not all that warm out to have everything opened up.

Monday, October 1, 2012

Bedroom and hall

A sneak peek at the closets we're building:


2x3 frame construction, 2 1/4" x 3/4" trim, 2" x 3/4" slats as shelving and bead board in the sides.

This is a closeup of one of the shutters we're going to use as doors.  I wish we had both sides of the hardware.  We're going to need make a slat as one is missing on a shutter.  I'll scrape and repaint them because we don't really want paint flakes all over the clothes.


These are some pages from the book we want to use as wallpaper in the hall


Starting to wonder if we should just use the reclaimed barn wood instead of trying to make the bricks work in the kitchen so we can use THAT floor in the hall.

Remember the reclaimed wood?  This is it, painted.  Thinking it might look good painted, with bead board partly up the walls and wall papered above with the book pages.


This could be a neat ceiling fixture...


Side note...this was in the wall in the bathroom.  Good thing we killed the power to it.  And yes, there were no wire nuts on it when we found it.


Just because...we've always wondered about this trim work.  WHY??


Tuesday, September 25, 2012

Why stop with the bedroom?

So we decided that while it was still nice out, we'd get the flooring out so we weren't dragging the bags of demo materials to the curb in the snow.  So...here's the results from the hallway:

Before...this is before we closed looking towards the living room


And the progress


I bet this is a new one for most people.  At some point, someone found the rot in the floor.  Rather than fix everything, they...poured concrete in the rotted area.  Yup.  Concrete.


All the rotted stuff is out, this is the concrete slab we sit on.


The floor


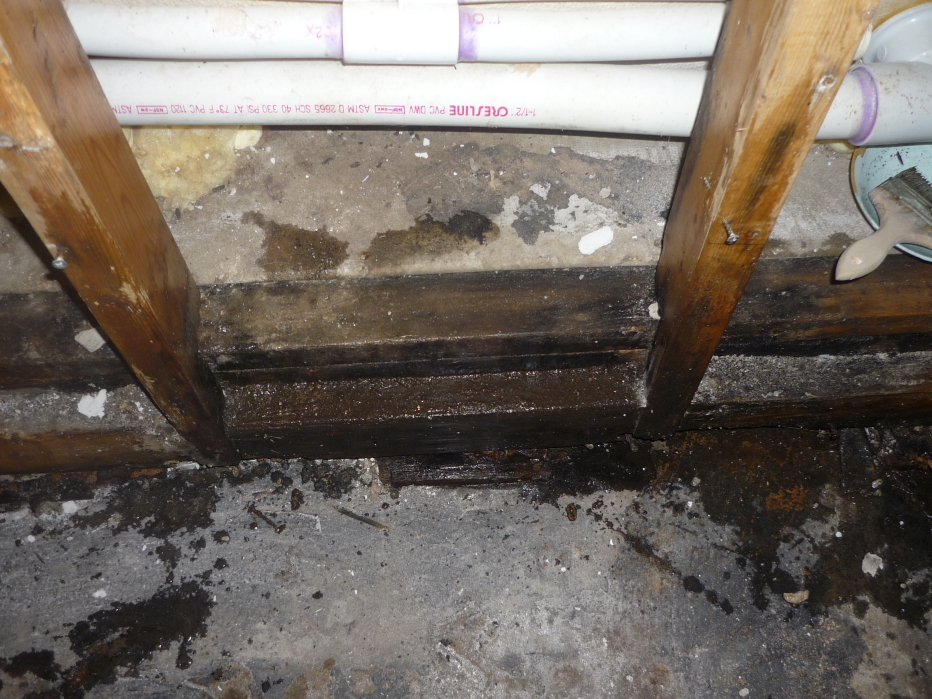
Mold on the wall.  The tub leaked.  For a LOOONNNGGG time.


Took out the moldy drywall.  You can see the long standing water damage.


This is one spot where the water ran down.


I have treated all of the mold with vinegar.

We didn't stop with the hall.  Major props go to Mr Eclectic for this part-he did all of the linoleum removal in the dining room and kitchen.

This was the dining room before we moved in.  It was faux wood adhesive "planks"  The enterprising person that laid it did so end to end rather than staggering the joints.  It looked ridiculous.


You can see the floor that was below it in this picture, it was worn but kind of fun-faux brick.  Too bad it had MAJOR adhesive (the black stuff all over the floor below).  That'll be "fun" to remove.


This is the floor in the kitchen now, the dining room is the same.


Another option, instead of trying to remove all that residue and patch in something in the hall, would be to completely replace the floor.  In the process, we could replace/repair the "sleepers" (small pieces of wood that sit between the concrete slab and actual wood floor to keep the floor raised up and give something to nail it to) that seem to have given away in some spots in the kitchen.  This is an option, light pine floors:


or stained a little, like these